 By
·
13 minute read
By
·
13 minute read
Table of contents
- Understanding Cisco ACI
- Why Choose CloudMyLab for Your ACI Bootcamp?
- Setting Up Your Cisco ACI Lab Environment
- ACI Fabric and Lab Summary
- Advanced Cisco ACI Labs and Configurations
- Next Steps
Understanding Cisco ACI
Cisco ACI (Application Centric Infrastructure) shifts network architecture from traditional command-line configurations to a policy-based model, especially benefiting data center environments. This approach ensures consistent and predictable network behavior, reducing the need for extensive manual configuration. ACI automates network operations, streamlines workflows, enhances security, and improves ACI scalability. With ACI, organizations can manage network resources dynamically, responding to changing business demands with greater agility and precision.
Why Choose CloudMyLab for Your ACI Bootcamp?
CloudMyLab’s Cisco ACI Bootcamp provides practical, in-depth training beyond theoretical knowledge, featuring challenge labs for hands-on experience. Recognized as offering some of the best Cisco ACI training, here’s what you can expect:- Hands-On Labs: Gain practical experience with advanced ACI configurations, including multisite deployments and tenant configurations, in labs designed to simulate real-world scenarios.
- Expert Instruction: Learn from industry-experienced instructors who can clearly explain complex ACI concepts and guide you through practical exercises.
- State-of-the-Art Lab Facilities: Train in labs equipped to mirror real-world network environments, ideal for mastering practical skills like ACI physical connectivity and out-of-band management.
- Up-to-Date Curriculum: Training modules are continuously updated to reflect the latest advancements in ACI and networking technologies, ensuring you learn current and future-relevant skills.
Features of CloudMyLab's ACI Learning Lab
CloudMyLab's ACI Learning Lab focuses on interactive learning and practical application, enabling participants to deeply engage with key ACI concepts.- Interactive Lab Modules: Expertly designed modules reinforce learning through hands-on exercises and real-world scenarios.
- Key Configuration Practice: Gain practical experience in configuring ACI multipod deployments, out-of-band management, VMM integration, and Cisco ACI L4-L7 integration.
- Confidence Building: Develop the skills and confidence to design, configure, and deploy robust ACI network infrastructures.
Hands-On Lab Access Overview
CloudMyLab provides easy and immediate access to a virtual ACI lab environment upon registration.- Immersive Virtual Environment: The lab closely simulates real-world ACI setups, providing a realistic hands-on learning experience.
- Comprehensive Exercises: Engage in a variety of labs covering ACI multipod configuration, out-of-band connectivity, VMM integration, and L4-L7 service graphs.
- Guided and Self-Paced Learning: Each lab provides detailed instructions and automated assessments to support comprehension.
- 24/7 Access: Enjoy flexible, uninterrupted access to the labs to learn at your own pace and schedule.
Comprehensive Bootcamp Curriculum Offering the Best Cisco ACI Training
The Cisco ACI Bootcamp curriculum is structured to provide a thorough educational journey, covering both practical applications and theoretical foundations. Key curriculum areas include:
- Core ACI Configuration: Master ACI multipod configuration, out-of-band management, physical connectivity, tenant configuration, and virtual machine manager (VMM) integration.
- Advanced Network Services: Understand and implement L4-L7 service graphs for network service chaining and enhanced security.
- Multisite ACI Deployments: Learn to design and manage sophisticated, efficient ACI multi-site infrastructures across multiple locations.
Setting Up Your Cisco ACI Lab Environment
Creating an effective ACI bootcamp lab environment with the right solutions is crucial for successful hands-on learning in the Cisco ACI Bootcamp. CloudMyLab’s approach is designed to provide an immersive and practical experience, ensuring participants not only learn Cisco ACI but also develop the crucial hands-on skills needed to confidently deploy and manage ACI in real-world scenarios.Virtual Labs for Practical Configuration
Participants will engage with fully virtualized ACI lab environments, allowing them to configure and manage all aspects of an ACI fabric without needing physical hardware. This includes setting up virtual "ACI Tenants" from scratch, providing a sandbox for practicing network segmentation and policy definition through hands-on exercises.Incremental Configuration and Advanced Progression
The lab curriculum is structured for incremental learning. Starting with basic fabric discovery and inventory (as covered in Lab 1), learners gradually build upon their configurations step-by-step. This progressive approach allows for a solid understanding of foundational concepts before moving into more complex areas. Crucially, the labs are designed to seamlessly integrate with virtual machine managers, enabling participants to explore the powerful synergy between ACI and virtualized workloads as they advance through the bootcamp.Exploration of Advanced ACI Architectures
As the bootcamp progresses, the lab environments evolve to support more advanced ACI configurations. Participants will have the opportunity to delve into complex topics such as Cisco ACI L4-L7 integration, allowing them to integrate virtualized network services, and even explore the foundational concepts behind ACI multisite deployments, preparing them for truly scalable network architectures.Understanding Rack and POD Configuration
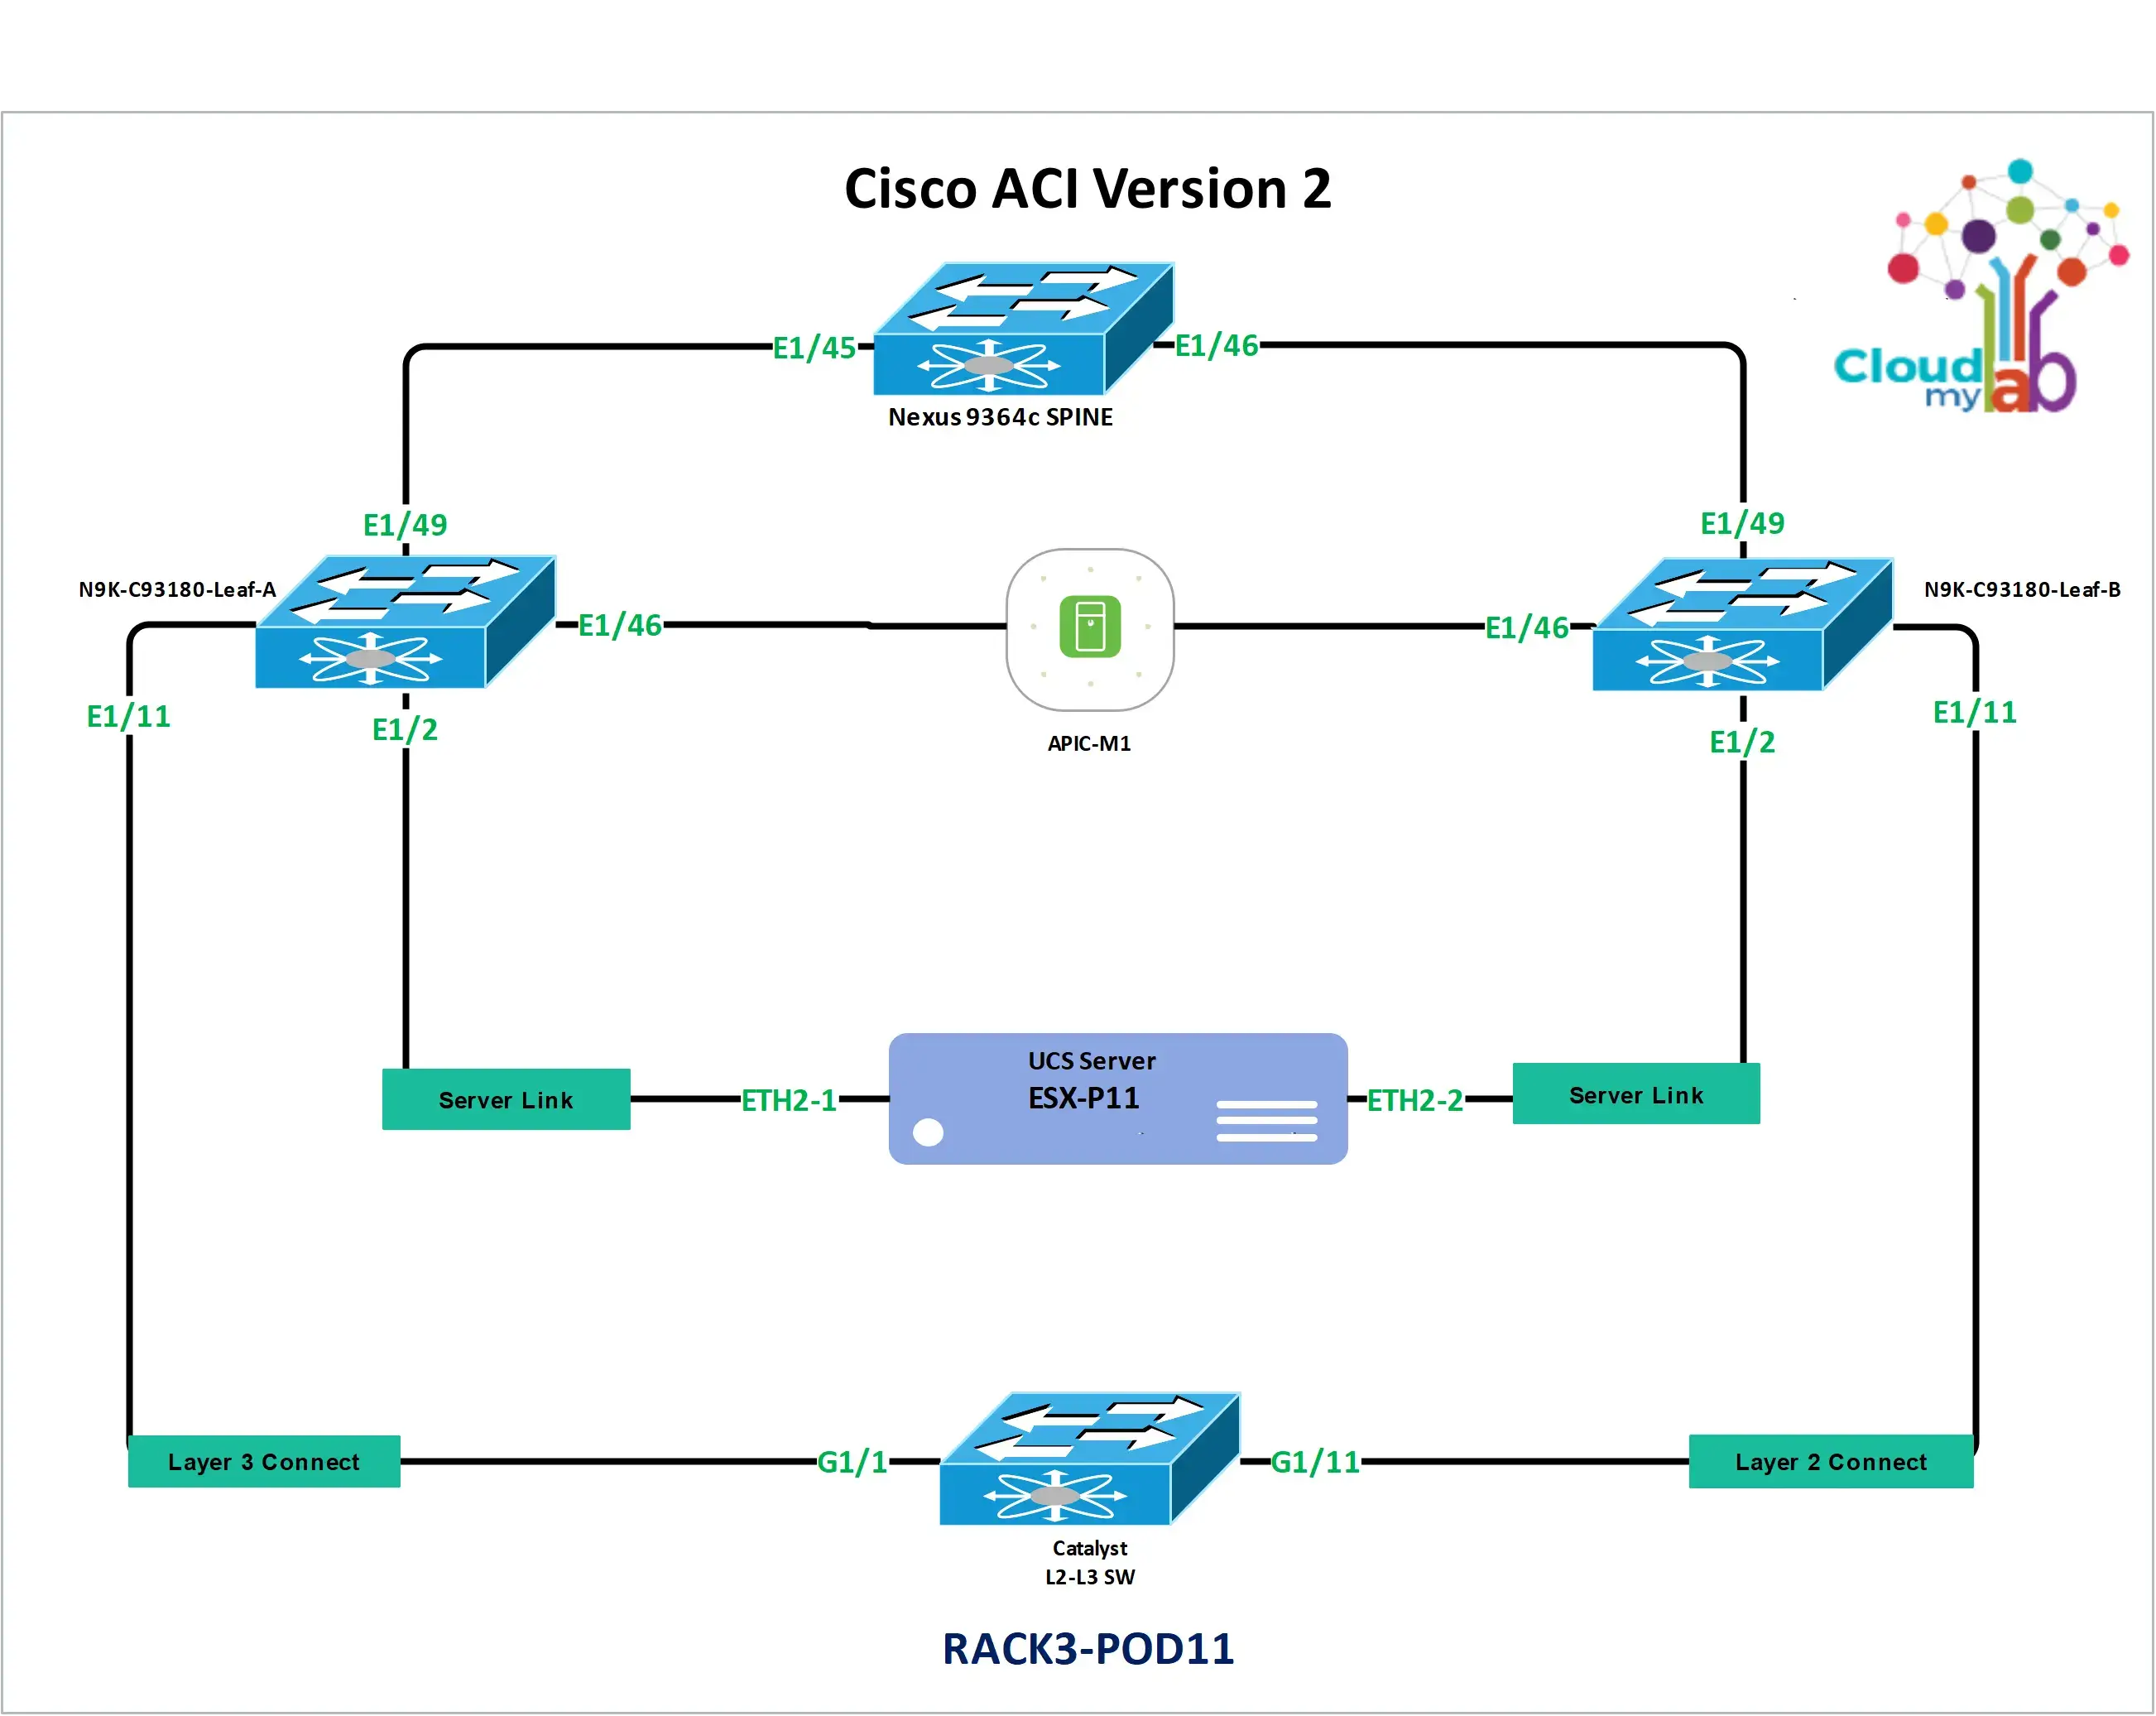
Underlying any successful ACI deployment, whether single-pod or multisite, is the principle of structured rack and POD configuration. Precise rack and POD setup is essential for ensuring the optimal performance and ACI scalability of an ACI deployment. Proper POD setup guarantees seamless integration of fabric components, directly reducing the risk of performance bottlenecks and enhancing overall network stability. CloudMyLab's hands-on labs are designed to empower learners to master every facet of this configuration process, from understanding physical connectivity best practices to tackling intricate multipod deployments, thereby building genuine confidence in their ACI skills.Proper POD setup ensures seamless integration, reducing the risk of performance bottlenecks and enhancing overall network stability.
Preparing for MultiPod Complexity
While the bootcamp labs provide a robust foundation, it's important to recognize the intricacies of real-world ACI MultiPod cluster configuration. Setting up a production-ready Cisco cloud APIC multipod cluster requires a deep understanding of ACI architecture's inherent multisite flexibility and the meticulous configuration of inter-cluster communication. Successfully navigating these complexities in the lab environment provides participants with a valuable sense of accomplishment and the foundational mastery required to handle dynamically growing, large-scale network infrastructures in their professional careers.ACI Fabric and Lab Summary
Lab 1: Explore the Cisco ACI Fabric Inventory
Learning Objective: Become familiar with the Cisco cloud APIC GUI, explore the ACI fabric inventory, and understand the critical role of Out-of-Band Management for secure and reliable network operations.
This initial lab introduces you to the Cisco Application Policy Infrastructure Controller (APIC) and the fundamental components of an ACI fabric. You will learn to log in to the APIC GUI, explore the fabric inventory, and configure essential initial settings like NTP and DNS. This lab also highlights the importance and configuration of Out-of-Band (OOB) Management, a crucial aspect for secure and resilient network administration.
Cisco APIC Controller Log-In and Fabric Discovery
- Connect to your Student PC.
- Log in as an admin with the password provided.
- Open a browser and navigate to the APIC GUI using the IP address provided.
- Complete the first-time setup, including NTP and DNS configurations.
- Verify fabric discovery and register fabric switches.
- Configure NTP server settings. You'll manually input or select NTP server addresses within the APIC GUI.
- Set up DNS server configurations. You'll configure DNS server addresses, search domains, and potentially DNS client settings in the APIC.
- Define OOB management IP addresses for the fabric switches. You'll assign dedicated IP addresses for out-of-band (OOB) management to the spine and leaf switches.
- Verify the settings and ensure proper connectivity. You'll use tools within the APIC or your student PC to verify that the OOB management is configured correctly and reachable.
- Explore the Cisco APIC GUI and review the global configuration settings. You'll navigate through different sections of the APIC GUI, examining global settings that apply to the entire fabric.
- Familiarize yourself with the dashboard and its components. You will examine the APIC dashboard, understanding the different widgets and information displayed, such as fabric health, faults, and inventory summaries.
- Precise Control and Monitoring: Leveraging this feature allows administrators to precisely control, monitor, and troubleshoot network devices without interfering with regular data communications.
- Enhanced Operational Efficiency: This approach fosters an enhanced level of operational efficiency, empowering teams to swiftly diagnose issues and deploy fixes, mitigating potential disruptions while maintaining operational integrity.
- Peak Network Performance: By incorporating out-of-band management into their ACI environment, enterprises can achieve peak network performance, robust security measures, and unparalleled system resilience, reinforcing their competitive edge in an ever-evolving digital landscape.
Lab 2: Implement Cisco ACI Fabric and data plane
Learning Objective: Build the foundational data plane of the ACI fabric by configuring interface policies, vPCs, and switch profiles, establishing connectivity to hypervisors.
This lab focuses on implementing the data plane of the ACI fabric. You will configure interface policies for physical ports, create vPC (virtual PortChannel) configurations for redundancy, and define switch profiles to apply these configurations to the leaf switches. This lab sets the stage for connecting endpoints, such as hypervisors, to the ACI fabric and establishing basic network connectivity.
Configure Interface Policies
- Create interface policies for CDP, LLDP, and port channels. You'll create policies to define how interfaces on the ACI switches will behave, specifically regarding protocols like Cisco Discovery Protocol (CDP), Link Layer Discovery Protocol (LLDP), and port channeling.
- Enable CDP, disable LLDP, and configure port channel policies. You'll specifically enable CDP (a Cisco proprietary discovery protocol), disable LLDP (an open standard alternative – often disabled in favor of CDP in Cisco environments), and configure policies for link aggregation (port channels) to increase bandwidth and redundancy.
- Create a vPC interface policy group and bind interface policies to it. You'll create a virtual PortChannel (vPC) interface policy group. vPC allows you to create a logical port channel that spans two physical switches (leaf switches in ACI). You'll then bind the interface policies created in the previous step to this vPC policy group.
- Specify interface IDs and associate them with the interface policy group. You'll create a leaf interface profile and specify the physical interfaces on the leaf switches that will participate in the vPC. You will then associate this interface profile with the vPC interface policy group you created earlier.
- Associate leaf switches with the leaf interface profile for your hypervisor. You'll create switch profiles and associate specific leaf switches in your ACI fabric with the leaf interface profile you configured. In this context, you are preparing to connect a hypervisor (like VMware ESXi) to these leaf switches.
- Check the vPC status and ensure proper connectivity between leaves and the hypervisor. You'll use APIC GUI or CLI tools to verify the status of the vPC you configured (e.g., peer status, consistency checks). You'll also test connectivity between the leaf switches configured with vPC and a connected hypervisor (or simulated endpoint) to ensure the vPC is functioning as expected.
- Establish seamless communication and robust network performance across different locations.
- Proper physical connectivity, including that to the data center, lays the foundation for a robust and resilient network, integral to executing complex configurations like ACI multipod and multisite deployments. For instance, ACI out-of-band management necessitates separate cabling pathways from the data traffic, while ACI VMM integration might demand a more dynamic approach to server-to-switch connectivity. In CloudMyLab’s Cisco ACI Bootcamp, participants delve into best practices for physical connectivity, acquiring the skills to architect and implement networks that stand the test of time.
Lab 3: Configure Cisco ACI Logical Constructs
Learning Objective: Master the configuration of key ACI logical constructs including Tenants, VRFs, Bridge Domains, Application Profiles, EPGs, and Contracts to define application-centric network segmentation and policies.
This lab focuses on configuring the fundamental logical building blocks of Cisco ACI. You will learn to create and manage Tenants for network segmentation, Virtual Routing and Forwarding (VRFs) for Layer 3 isolation, Bridge Domains for Layer 2 connectivity, Application Profiles to organize application components, Endpoint Groups (EPGs) to group endpoints, and Contracts to define policy-based communication between EPGs. This lab is crucial for understanding ACI's application-centric approach and how to define network policies using logical constructs.
Create a Tenant and VRF
- Define a tenant and VRF in the APIC GUI. You'll create a Tenant, the highest level of logical separation in ACI, and a Virtual Routing and Forwarding (VRF) instance within that tenant. Visualizing and articulating the tenants’ structure enables practitioners to configure contracts, application profile definitions, and subnet policies. Thus, enabling seamless communication between relevant endpoints while maintaining rigid security controls across network boundaries.
- Configure a bridge domain and associate it with the VRF. You'll create a Bridge Domain, a Layer 2 forwarding construct similar to a VLAN but with more advanced capabilities, and associate it with the VRF created in the previous step.
- Define subnets within the bridge domain. You'll define IP subnets associated with the bridge domain.
- Set up an application profile and create EPGs for different application tiers. You'll create an Application Profile, which represents a collection of related application components. Within this profile, you'll create Endpoint Groups (EPGs), which logically group endpoints (like VMs or servers) based on application function (e.g., web tier, application tier, database tier).
- Define filters for ICMP, SSH, HTTP, and FTP traffic. You'll create Filters, which are access control lists (ACLs) that define specific types of network traffic (e.g., ICMP, SSH, HTTP, FTP based on port numbers and protocols).
- Create contracts and associate filters with them. You'll create Contracts, which are policy constructs that define how EPGs are allowed to communicate with each other. You will associate the filters you just created with these contracts.
- Assign contracts to EPGs to control traffic permissions between them. You will "consume" and "provide" the contracts you created by associating them with the EPGs. For example, you might configure the 'web tier' EPG to provide the 'HTTP contract' and the 'application tier' EPG to consume the 'HTTP contract', allowing web traffic from web tier to application tier, as defined by the contract.
Lab 4: Integrate Cisco ACI with VMware Using Native DVS
Learning Objective: Master the integration of Cisco cloud ACI with VMware vSphere using the native Distributed Virtual Switch (DVS) integration, enabling unified management of physical and virtual networks.
This lab focuses on integrating your Cisco ACI fabric with a VMware vSphere environment using the native Distributed Virtual Switch (DVS) integration. You will learn to configure the necessary components in both ACI and vCenter to establish seamless communication and policy synchronization between the physical and virtual network layers. This lab demonstrates how ACI extends its application-centric policy model into virtualized environments, enabling consistent management and automation across your entire infrastructure.
Configure VMM Domain Integration
- Define VMware vCenter as a VM manager on the Cisco APIC. You'll configure a VMM Domain in the APIC, specifying VMware vCenter as the Virtual Machine Manager.
- Configure a VLAN pool and vCenter domain. You'll create a VLAN pool to be used for communication with the VMware environment and associate it with the vCenter domain.
- Ensure the APIC has discovered the vCenter and its inventory. You'll check the APIC GUI to confirm that the APIC has successfully connected to the vCenter and has discovered the vCenter inventory (like datacenters, clusters, hosts, VMs).
- Create an Attachable Access Entity Profile (AAEP) for the vCenter connection. You'll create an AAEP (Attachable Access Entity Profile), a policy construct in ACI that defines how external entities (like VMware vCenter) connect to the fabric. You'll configure the AAEP to selectively allow VLAN traffic relevant to your VMware environment.
- Add the hypervisor and its uplinks to the DVS in the vCenter. Through the vCenter interface (or potentially via APIC integration), you will add an ESXi host and its physical uplinks (network adapters) to the Distributed Virtual Switch (DVS) managed by ACI.
- Link EPGs with the VMM domain to provision DVS port groups. You'll associate the Endpoint Group (EPGs) you created in Lab 3 with the VMM Domain. This action will automatically provision Distributed Virtual Port Groups (DVPGs) on the VMware DVS, linked to the ACI EPGs.
- Verify connectivity among VMs within the same EPG. You'll deploy or assign virtual machines to a single DVS port group (which corresponds to an ACI EPG). You will then test connectivity (e.g., ping) between VMs within the same EPG to verify that intra-EPG communication is working as expected (and is allowed by default in ACI).
- Test connectivity between VMs in different EPGs based on configured contracts. You will deploy or assign VMs to different DVS port groups (each linked to a different ACI EPG). You'll then test connectivity (e.g., ping) between VMs in different EPGs. You will observe whether communication is allowed or denied based on the contracts you configured in Lab 3.
Advanced Cisco ACI Labs and Configurations
Lab 5: Integrate Cisco ASAv with Cisco APIC
Learning Objective: Master the deployment and configuration of service graphs for integrating L4-L7 services like firewalls and load balancers into ACI.
This lab focuses on implementing L4-L7 Service Graphs. You will learn how to integrate virtualized network services, specifically the Cisco Adaptive Security Virtual Appliance (ASAv) firewall, into the ACI fabric using service graphs. You'll configure traffic redirection through the ASAv for security inspection, enabling advanced service chaining and policy enforcement.
Lab 6: Configure Role-Based Access Control
Learning Objective: Understand and implement RBAC in ACI to manage user access and administrative permissions for enhanced security and operational control.
This lab covers Role-Based Access Control (RBAC) in ACI. You will learn how to implement RBAC using default roles and how to create custom security domains to delegate administrative privileges and control access to different parts of the ACI fabric based on user roles and responsibilities.
Lab 7: Explore Cisco ACI Monitoring and NetFlow
Learning Objective: Gain proficiency in utilizing Cisco ACI monitoring tools and NetFlow capabilities for network visibility, performance management, and troubleshooting.
This lab focuses on ACI Monitoring and NetFlow. You'll explore the built-in monitoring capabilities of ACI, learn how to use tools to monitor fabric health and performance, and configure NetFlow export to collect detailed traffic flow data for analysis and troubleshooting.
Lab 8: Enable Connectivity to External L3 Networks
Learning Objective: Master the configuration of external Layer 3 connectivity in ACI to integrate the fabric with existing routing infrastructure.
This lab covers External Layer 3 Connectivity. You will learn how to connect the ACI fabric to external Layer 3 networks (like the internet or corporate WAN) using protocols like OSPF (Open Shortest Path First). You'll configure policies to advertise internal ACI networks to the external world and learn how to control routing and traffic flow.
Lab 9: Enable Connectivity to External L2 Networks
Learning Objective: Understand and configure external Layer 2 connectivity in ACI to seamlessly integrate with existing VLAN-based networks.
This lab focuses on External Layer 2 Connectivity. You will learn how to extend ACI Endpoint Groups (EPGs) and Bridge Domains to external Layer 2 networks. This allows you to integrate legacy VLAN-based networks or physical devices into the ACI fabric at Layer 2, providing a bridge between traditional and ACI-managed environments.
Lab 10: Configure Cisco APIC Using REST API
Learning Objective: Develop skills in using the APIC REST API for programmatic management and automation of ACI fabric configurations.Develop skills in using the APIC REST API for programmatic management and automation of ACI cloud fabric configurations.
This lab introduces REST API Automation for APIC. You will learn how to use the RESTful API provided by the APIC to manage and configure the ACI fabric programmatically. You'll practice sending API calls to retrieve information, create configurations, and automate tasks, moving towards infrastructure-as-code principles.
Lab 11: Configure Cisco APIC Using Python Scripts
Learning Objective: Learn to automate ACI fabric management using Python scripting and the APIC REST API, improving operational efficiency and consistency.
This lab builds on Lab 10 by focusing on Python Scripting for ACI Automation. You will use Python libraries to interact with the APIC REST API, write scripts to automate repetitive ACI tasks, and learn best practices for using Python to manage network infrastructure.
Lab 12: Explore Cisco ACI App Center and Cisco ACI Optimize Feature
Learning Objective: Discover the ACI App Center for extending ACI functionality and learn how to use the ACI Optimize feature for performance tuning and resource optimization.
This lab explores ACI App Center and Optimization Tools. You will discover the ACI App Center, a platform for deploying and managing applications and integrations within the ACI fabric. You will also explore the ACI Optimize feature, which provides recommendations for improving fabric performance and efficiency.
Lab 13: Explore Cisco ACI Troubleshooting Tools
Learning Objective: Gain proficiency in using ACI's troubleshooting tools and techniques to diagnose and resolve common network issues within an ACI fabric.
This lab focuses on ACI Troubleshooting Techniques. You will learn to utilize various command-line interface (CLI) tools and diagnostic features built into ACI to troubleshoot common network issues within the fabric. You'll practice diagnosing connectivity problems, policy misconfigurations, and hardware faults using ACI's built-in tools.
Lab 14: Export TechSupport
Learning Objective: Understand how to generate and export ACI TechSupport files for advanced troubleshooting and support purposes.
You will learn how to export TechSupport files from the APIC. These files contain detailed logs, configurations, and diagnostic information that are crucial for escalating complex issues to Cisco TAC (Technical Assistance Center) or for in-depth analysis.
Next Steps
Ready to improve your network management skills?- Get Started: Reserve your lab today and start experimenting with different network setups.
- Learn More: Visit the CloudMyLab website to explore our offerings and pricing.
- Contact Us: Have questions or need assistance? Reach out to our support team via email at support@cloudmylab.com or use the live chat feature on our website.
